Monday, October 31, 2011

Product Review: Power of Pink Conair Infiniti Curling Wand

I am so excited to review this product for you guys! It is by far my FAVORITE hair product I have purchased all year, and that says a lot.  I originally wanted this a few months ago, but didn't get around to purchasing it so when I saw that during the month of October, Ulta was offering this Limited Edition Breast Cancer Awareness version of the original one (I think it is just the color that is limited edition honestly) I was sure to scoop it up!

This is the curling wand that was featured in my most recent Shop and Tell Breast Cancer Month Feature. Here are a few of the pro's and con's that I found with this hair tool and my final thoughts on it:

Pros: 
  • I love the bright pink color, very different than the other lighter pink tones that I was seeing everywhere, adds a nice special "limited edition" touch!
  • I love the swivel cord because this assures that you never have any of those messy tangled wires to deal with.  
  • I love that you can choose from various different heat settings depending on what temperature you are comfortable with using on your hair type. (I use the hottest one because in my opinion, after a heat protectant, my hair can handle this :)
  • The fact that this curling wand heats up in no time is just wonderful as well, who wants to wait forever for their curling iron to heat up after all right?!
  • Another small but very helpful feature is a little plastic fastener on the cord. It allows you to secure the folded wire in place for safe and completely fool proof neat storage.
Cons: 
  • I find that my hair often slips down the barrel and this is definitely because of the way it is shaped.  I love the shape of the curl I get, but hate that I often have to "re-wrap" my hair around the barrel.  Practice is really the only thing that can assure that you encounter this less often. 
  • Another thing that I find happens a few times while I am in the process of curling is that I accidentally power off the curling iron all together! It's quite easy to do being that the button is right in an area where you are placing a good grip while curling.  It is easy to just switch it back on and because of the lightening fast heat up time, isn't REALLY a huge problem, but kind of annoying to say the least.  
** This comes with a glove to prevent you from burning the two fingers that get the closest to the iron while actually curling. Honestly, I need to separate the sections of my hair with those fingers, and wearing the glove didn't let me do so with ease, so I opted out of using this and I haven't really ever burned myself, so I don't think this is mandatory to use, up to you!

Some pics of my personal results:


I absolutely loved the results curling with this product gave me. They were the most natural looking beautiful waves ever! They started out tighter and throughout the day, fell just perfectly to a gorgeous look.  To top it off, I was SO surprised to find that even the next morning when I woke up, they looked the absolute SAME! I touched up the top of my hair a little with some hairspray and pinned back my bangs the next day and had the SAME beautiful waves, it was as if I had just curled them again.  This proved that this wand provides long lasting curls and I love that.  

**I used Heat Protectant as always, and for the hairspray, I used Paul Mitchell Soft Spray. 

Flowy Waves, 

xox 

Wednesday, October 26, 2011

Food for Thought

Here is more info for  my friends/family who were brought here through my personal Facebook page:

Although not a traditional bog post, this has just as much of my heart in it as all of my others.  Thanksgiving (here in the United States) is about being thankful, for friends, family, health, education, love in general life.  We share a warm meal with one another around the table because food always brings loved ones together, why do you think going out to dinner is one of the number one ways people celebrate their birthdays, such a special day? Reading the article about all of those Americans living amongst us (possibly even in our own neighborhood) who barely make ends meat and probably won't be having that Thanksgiving meal the same way we will this year, broke my heart.  Although poverty exists all over year round, the Thanksgiving season, one whose day is focused on a rather grandiose meal, is a rather unique time to do something about it, even if something small.

Here is what I am going to do, you can do the same for another family, or you can just spread the word and that will be enough!

1. I am enlisting each and every one of my Facebook friends reading this to try and really reach out in your community and think of someone who you think could use a little help with Thanksgiving this year.  Remember a turkey these days can cost $40+.  For those that do a meat alternative, it can cost a whole bunch of money as well!

2. Think of one family who you think in the goodness of your heart would like me to sponsor their Thanksgiving dinner this year.  I am no millionaire, and I work very hard for every dime I have but I can do without the movies and clothes shopping for a week or so to help a needing family out.  With lay offs STILL happening daily, some are afraid or embarrassed to ask for help, which is why I need YOUR help to nominate a family. 

3. This family can come from your church, maybe they just had a fire (as sad as that is, a lot more of those are happening!) maybe they just had another baby and times are really tough, maybe BOTH parents are out of work and struggling to put any food on the table all together.  Whomever you think deserves this, please nominate them.

4. I wanted to give you guys an entire month to work on this, although it may only take you a day or so to think of someone, the work for me is endless! haha I will do my best to provide to them a Turkey, potatoes, yams, rice, etc all the goodies that I grew up with for Thanksgiving.  I will probably shop for the family a week before so that when I deliver everything it is still delicious (most will be non-perishables anyway).

5. Here's all you have to do:

  • Think of the family who is struggling a lot this year that you wish to nominate and get their name to me. (EVERYTHING we discuss is CONFIDENTIAL and will in no way, shape or form EVER be shared with anyone else, other than probably my boyfriend, the driver haha) I know most people are embarrassed about going through hard times, and although they shouldn't be, I respect that completely!
  • Once you get me their name, your work is done, I will stay in touch with you when I decide which family I am going to choose. I wish I could choose them all, but hey maybe this will inspire you guys to take one of them on?!
  • They can be from your workplace, church, neighborhood, family etc. EVERYONE in need qualifies :)
  • Shoot me an email at alysea.pereira@gmail.com  if you want to know anything further or send me a message on my facebook--although I prefer email because I can keep track of everything better!
Thank you ALL so much in advanced. I am no angel, but together we can ALL make a difference, and where I have plenty, I will ALWAYS share with those who don't.  Food can really heal the soul, even a simple plate of rice.  Being able to spend the day with your family during this Thanksgiving Holiday season can really be a "pick me up" for someone, and after all, that's what we are striving to do here.

To being thankful always,

xox

Tuesday, October 25, 2011

Mini Shop and Tell : October Breast Cancer Awareness Purchases!

So the time has FINALLY come, everything has come together as far as my BCA purchases this month. Now when you see that its really only about 5 things, you are probably going to wonder why it was so "stressful" getting those things but let me just say, it was a good and a bad thing.  It was good that things were sold out almost everywhere (and I started shopping for this stuff rather early too!) because that meant that Breast Cancer was getting a lot of money, but a bad thing as well because it was taking me forever to get my hands on any of this stuff! Anywho, enough rambling, let me just show you the items!


 Shown above are the following:

1.Limited Edition Power of Pink Conair Infiniti Curling Wand---$39.99
  • Can be purchased by clicking here: Ulta
2. Ulta BCA Thermos ---FREE with any $5.00 Donation
  • Unfortunately I don't even see this on their site anymore, they were apparently their biggest seller! They still do, however, offer a pink ribbon cosmetic bag with any $10.00 donation.  View this offer here: ULTA
3. The North Face Breast Cancer Limited Edition Denali Fleece---$165.00 (a gift from my boyfriend!)
  • This was purchased as a gift from Sports Authority. The link is here: Sports Authority
4. Seche Vite/China Glaze Nail Polish and Top Coat Duo---$8.99
  • This was purchased from Sally Beauty Supply.  (I only paid about $7.00 with my Beauty Pro Card!) It can be viewed online here: Sally Beauty Supply 
5. Brush Strokes Teasing Brush--$1.99
  • This was purchased from Sally Beauty Supply as well.  It can be viewed online here: Sally Beauty 
6. Its a 10 Leave in Miracle Product---$17.00 or so
  • I got this product from SuperCuts as my Aunt is a stylist there :) Some of the proceeds from this one went to the Christina Applegate Breast Cancer Foundation!
Well that sums up my Breast Cancer Awareness purchases.  A portion of the money earned from the purchase of each and every one of these products was donated to raising awareness and money for research for Breast Cancer.  Most of these were all on my wish list anyway and I figured why not have them go to a good cause as well! After all, they came in pretty pink colors anyway ;)

Monday, October 24, 2011

My Visit to the World Trade Center Memorial Site NYC

So, as some of you may know, I live just about 15 minutes outside of NYC.  Although the tragic events that happened on September 11, 2001 did not affect me directly, they did affect the hope of the wonderful country that I live in, and because of that I guess you could say I WAS directly impacted.  I remember that day like it was yesterday, as I sat in my first class of the day as a freshman in high school which was then English.  We got released by 11am that day because parents were coming to the school frantic and disoriented about what had just happened.  I remember being thankful that I didn't know anyone that was close to me that worked in NYC, but seeing that some of my very dear friends couldn't say the same, my heart hurt with them.  As the months and years passed, I saw flags everywhere, as a matter of fact the #1 flag store in my neighborhood was sold out of EVERY American flag in just hours! That said a lot, that said that we were all coming together as ONE nation and standing TALL--that our pride had indeed NOT been tarnished and for that I am one proud American girl.

10 years later, what was once the most chaotic and debris filled section of all of NYC is now the home of a beautiful memorial.  A place where those innocent lives that we lost from our American Family, can be honored and visited to remember.  I had not had any intention of ever visiting "Ground Zero" in the previous years because I knew what it would entail and I was not quite sure I was ready to "remember" all that had happened.  However, now that something so monumental and beautiful has been resurrected, I am sure that now, was just the perfect time to go.  As the rebuilding continues of the new towers, seeing the progress that each building has made brings a smile to my face, after all we are progressing as opposed to regressing, and that is always something wonderful.

I was lucky enough to be invited on the First Responders day by a fellow First Responder himself.  I made this journey with my boyfriend and his family, and it was for sure one that I will never forget.  I highly recommend visiting if you are ever in the area, it is something that every American (and those who aren't as well) should do even just once.  Below are some pictures of my adventure:


We are making progress! That is only HALF way done! What a beauty :)

My boyfriend's sister pointed out the rainbow that had formed just as we were about to leave. Do you see it in the corner, it gave me happy peaceful chills. That must be what happens when there is so much love in one place <3

This tree is the ONLY tree that survived the tragedy.  You can see that one half of the tree was seared and disturbed, where as the other half managed to rebuild beautifully--definitely amazing!

The Fire House only a block or so from the WTC. I was told these  were the first ones on the site and were all killed :( What a beautiful bronze piece of art.


Proud to be standing there after all these years. God Bless America <3

Thursday, October 20, 2011

Product Review: Maybelline Instant Age Rewind-Dark Circle Concealer


My Color: #30 Medium                               Price $ 7.99 (approx)

Things I Love: 

1. That it comes in a shade that actually matches what I am looking for! So many of these under eye concealers just don't match up well with my skin tone--odd I know. 

2. I love that you can see through this tube exactly how much product you have left--with my Garnier roller-ball one, I could never tell and I was always afraid of one day just suddenly running out.  

3. The quality for a drugstore reasonably priced item. The Garnier one I used before this retailed for around $13! I actually prefer this one and its almost 50% cheaper!

4. NO CREASING or settling in fine lines! I cannot stress enough how much this kind of thing bothers me. I am only 24 people, there is NO reason why I should have concealer settling under the "fine lines" beneath my eyes haha With this one there are none of those shenanigans going on. 
5. The applicator is so cool! It is like a velvety sponge where you click to activate the product from beneath to come into the sponge tip. Then you just swipe it in a "U" shape under your eye, that simple! 

6. Its durability--I have to say that personally speaking I haven't really noticed any fade with this product, I have been satisfied with how it holds up throughout the day for sure!

Although I don't particularly use this for dark under eye circles, because I don't have those, I use this as more of a slight brightener and it works wonderfully for that as well. I definitely recommend this product if you are looking for a drug store under eye concealer :) 

Bright eyes, 

xox

Tuesday, October 18, 2011

Good Eats: Delicious Chicken Parmigiana!


Chicken Parmigiana has always been such a classic go to dish when there are any chicken breasts/cutlets lying around. Its so simple, takes very little ingredients that you wouldn't already have in your pantry or fridge and yet turns out so juicy and delicious! This is something that you can whip up in a jiff if you are expecting company, or like my boyfriend and I love to do, just make it for the two of us :) Hope this is simple enough for you to understand and I hope it warms your tummy sooner than later!

Ingredients:

2 Tbsp Garlic Powder
6 Tbsp Extra Virgin Olive Oil
4 Garlic Cloves, minced
1 Pound Box of  angel hair (or any long pasta that you desire)
1 Tbsp of Milk
1 8oz Ball of Fresh Mozzarella Thinly Sliced
9 Slices of Provolone Cheese
2 28oz Cans of Crushed Italian Tomatoes
4 Boneless Skinless chicken cutlets
2 Tbsp Fresh Chopped Basil
2 Tbsp Fresh Chopped Parsley
1 Cup White Wine (Remember, NEVER cook with wine you wouldn't drink!)
1.1/2 Cups Plain Bread Crumbs
1/2 cup All Purpose Flour
1/2tsp Hot Pepper Flakes

3 Eggs
Fresh Parmiggiano Cheese--as much as your taste-buds like!
Salt and Pepper, to taste


Preheat oven: 425 degrees


1. Heat 3 Tbsp of EVOO and garlic in a medium saute pan. Saute until the garlic is light brown and fragrant--make sure you do not over cook the garlic because it can burn at the drop of a dime! Add hot pepper flakes (I add a nice amount of these because like you know, I like spicy things, but if not just add a pinch-a little goes a long way)  and cook for 45 more seconds. Add your white wine and let the alcohol cook out and the wine reduce by half about 5 mins. Add the tomatoes and season with salt and pepper to taste. Cook your sauce for about 20-25 mins. Make sure to taste every now and then to assure its to your liking.

2. In the meantime, you are going to start preparing your chicken cutlets.  Wash them thoroughly and trim any fat that may be there. Get two shallow dishes for the flour and eggs. Season the flour with salt and pepper. In the bowl with the eggs, combine them with salt and pepper and the milk--beating them all together. Put the bread crumbs on a plate and season with the garlic powder and salt and pepper.


3. Grab yourself another medium saute pan and heat 3 tablespoons of olive oil over medium-high flame. Lightly flour both sides of the chicken cutlets, and then dip them in the egg wash to coat completely, letting the excess drip off, next dip them into the bread crumbs coating completely. When the oil is heated enough, add the chicken and fry for 3-4 minutes on each side until golden and crusty then flip them over and repeat on the other side!

4. Once the sauce has been simmering and cooking for about 30 mins, add your fresh chopped parsley and basil. (Nothing will compare to fresh herbs in this so try your best to not do the dry stuff) Next grab your handy dandy ladle spoon and take 1 cup of sauce and spread it over the bottom layer of a 9 by 9 non stick baking dish and place the chicken cutlets on top. Ladle some of the sauce (remember to leave some out to top your pasta) over the chicken cutlets and top them off with a few slices of the fresh mozzarella,  1 slice of provolone each  and a good amount of fresh parmiggiano cheese which you are going to shred with your micro-plane :)


5. Bake these in your oven for 10 minutes or until golden brown and bubbly, meanwhile as the chicken bakes cook your pasta according to package directions. Drain your pasta as you normally do and add that extra sauce that you set aside :)


6. Finally you are ready to serve this dish up! Grab a plate and serve each person one piece of chicken that will by this point be oozing with cheesy goodness and saturated in that savory sauce.  I put the chicken right on top of the pasta in the dish and before you know it's gone--that's how good it is :)  Make some quick garlic bread in your oven (which btw you can throw in toward the end of the chicken baking to assure you use as little time as possible!) and your stomach will thank you tremendously!


There you have it ladies and gents, I made this as my family Sunday dinner two weekends ago and I am definitely looking forward to making it again because it was honestly SO simple!  The hardest part was watching it through the oven glass as the cheese became golden and bubbled--I was ready to just take it out and scarf it all up before it was even finished! haha

Oozing with Cheesy Saucy Goodness, 

xox

Monday, October 17, 2011

Pairing Your Eye Look with a Perfect Lip Color!


Let me just state that if you read this and think "oh man I have been doing this wrong all along"--please DON'T! This is not something that everyone HAS to follow, if you have been doing your matching differently and are comfortable and confident in the way your look has come out, that is all that matters! This is pretty much for those who have a hard time pairing these things together and are looking for some pointers in some sort of direction because they are completely or partially lost when it comes to this :)

Generally speaking, the above photo that I created is how you want to go about matching your eye/lip colors. When wearing a purple eye look (from the cool side), I love pairing this with a coral/peach lip (from the warm side)--these colors (purple and orange) look great together because they perfectly balance one another out.  This is what this technique is all about after all, balance!

Another example would be if you are doing a gold (yellow) eye look, throw this together with a pink lipgloss.

* with pink, you can have certain pinks that are cool and others that are warm. A good way to tell is if you look at the pink and see if you catch a blue hint to it, if so its cool--however, if you look at the pink and don't see a blue hint, but rather a more reddish undertone, this is a warm pink and you can follow the warm "rules" when it comes to this :)

Although quite a simple post, I hope this helps those of you who may be looking to perfect your "pairing" skills! :) this is in fact VERY similar to the color wheel "rules" when it comes to fashion, so if you are good with one, chances are you will be good at the other.


Bonus:

My favorite warm lipglosses: , MAC Love Nectar, NYX Nude Peach
My favorite warm lipsticks: Neutrogena Poppy Red, Estee Lauder #123 Fig, Revlon #680 Temptress, MAC So Chaud
My Favorite cool lipsticks: Revlon Pink Pout, Revlon Black Cherry (this is almost a mix between a VERY deep red and a VERY deep purple--looks almost black in packaging, but I think its SO cool for fall :)
My favorite cool lipglosses: NYX Beige, MAC Love Culture

to WARM days and COOL nights,

xox

Thursday, October 13, 2011

Good Eats: Pumpkin Spice Cupcakes with Cream Cheese Frosting!


I made these cupcakes because anything Pumpkin makes me feel cozy and warm inside during the Fall Season :) I had no idea how they were going to come out as this was my first time making them, but they were BEYOND a huge success...16 were consumed in less than 24 hours! haha (not by only me of course, imagine!) lets get started so you can enjoy too:


Ingredients:  (yields about 16 cupcakes)

1 tsp Pumpkin Pie Spice (found in those little plastic jars in the spice aisle of your supermarket)
1 cup of All Purpose Flour
1/3 cup of Vegetable Oil
2 Eggs
1 cup white granulated sugar (the regular kind we all have in our kitchen!
1/2 tsp of Vanilla Extract
1/4 tsp salt
3/4cup of Pure Pumpkin Puree (make sure its not pumpkin pie FILLING, there is a big difference!)
1 tsp of Baking Soda
1/2tsp of Baking Powder


Oven Temp : 350


1. In a large bowl, whisk together the eggs, pumpkin puree, vanilla, sugar and vegetable oil. Add the dry ingredients and keep whisking together until everything is well mixed. 


2. Grab your pre-lined cupcake tin and get your ice cream scooper out (these are also sold as cookie scoopers) and begin to scoop the cupcake batter into the cupcake liners, filling them about 2/3 of the way up. 

3.Bake for about 20 mins, or until you stick a toothpick of small knife (which is what I had to do here!) can easily be inserted into the center of each cupcake and come out clean! This means they are done and ready for cooling. 

4. Take the cupcakes out of the tray and allow them to cool before frosting. 


Cream Cheese Frosting...homemade!

Ingredients: 

2 Tbsp. Milk
4 oz of Cream Cheese, at room temperature
4 Cups of Confectioners Sugar
2 Tbsp of Unsalted Butter, at room temperature
½ tsp of Vanilla Extract

1. In a large bowl you are going to want to whisk everything together EXCEPT the milk. Make sure everything is thoroughly mixed together with no lumps and bumps. I find that adding the confectioners sugar a cup at a time really helps this all come together smoothly :)


2. Lastly, add the milk and mix together again, just until everything is combined. Cover this frosting mixture with plastic wrap and set aside, I set mine in the fridge just because its a habit of mine haha but you don't have to--outside the fridge will work just as well.You are going to want to leave it be for about 45 mins.  


3.You are now ready to frost your cupcakes! For this, I use the back of a teaspoon, I find that it makes spreading and smoothing out the frosting onto the cupcake SUPER easy.  Also note that in the picture above you can see that I haven't mounded on the frosting, unless you are a frosting fanatic, I think that a little frosting really adds just the "icing on the cupcake" haha You don't want the icing to overpower the delicious pumpkin spice flavors that you have in the actual cake part. Cloves, Nutmeg, Cinnamon etc, those flavors will come through beautifully if you trust me on this! :)

There you have it--I hope if you are reading this that your mouth is watering and you're thinking of when you're going to whip these babies up, just posting this made me want to make another batch! Enjoy! 

Pumpkins and Cream Cheese, 

xox

Wednesday, October 12, 2011

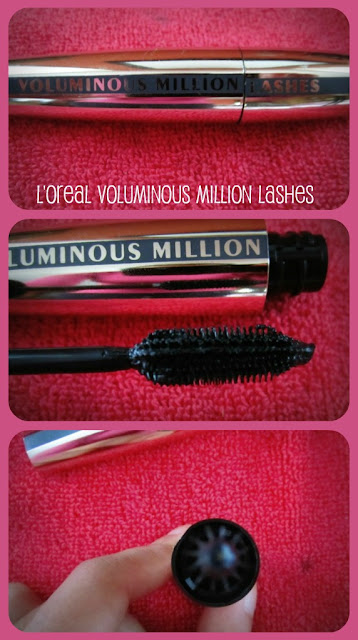
Makeup Review: L'Oreal Voluminous Million Lashes Mascara!


Things I love: 
  • The packaging--its a nice shiny gold, so pretty :) haha
  • The way it separates my lashes IMMENSELY
  • The wand type, its the perfect size, not too big or small 
  • The little spoolies shape, not sure if you can tell in the pic above, but its like a propeller shape.  Add this with TONS of bristles and you are bound for the "millions of lashes" look!
  • How black it is, I believe mine is "blackest black" -or something like that. 
**I absolutely LOVE L'Oreal Mascaras, they have always been my favorites even after branching out to try other brands, I don't know what they're doing, but I hope they keep it up. I decided to give this one a whirl because just the name in itself sounded promising, especially from a very reputable brand.  I was pleasantly surprised with the results, and this has become my new favorite mascara.  I have pretty long lashes to begin with, but I can definitely attest to the fact that this mascara separates each and every lash because of the brush and it also does not get clumpy (which is obviously a plus!) I cannot think of anything that really bothered me to mention, so I will leave it at this and say that I definitely recommend trying this! :)

To gals batting their beautiful lashes everywhere,

xox 


Monday, October 10, 2011

Those Who Conquered Breast Cancer Series : M's Story

This week, I would like to start off with my very first feature for this October Breast Cancer Survivor Spotlight Series on my blog.  I think it is something that can spread hope, love and encouragement, and I strongly suggest reading one of these when you feel like you are maybe having a bad day, you are not alone in the "having a bad day" department, and as long as you have hope, your faith in a brighter tomorrow will push you through I promise! I hope that the stories that these women have offered, touch your hearts, and instill in you a sense of dedication to your emotional and physical health, and not only that, but also a sense of pride in being a woman/man who can make it through anything! Lets begin:

*The person sharing this story will be referred to as "M".


How did this person come about the idea that maybe something was wrong? 

came across what appeared to be a small lump in her left breast while in the shower during a normal body wash.  Having had a mammogram just three months earlier, she thought it was almost impossible for it to be anything serious.


How did this person go about getting checked out to see what could be wrong? 

She scheduled an appointment to have this lump checked out with her General Practitioner the next morning, he scheduled her for another mammogram and ultrasound right after he too noticed the lump.  After reading the ultrasound and being told by the Doctor that it was a mere cyst, although a bit relieved, she was still not at ease. It was told to her that they would try and go about draining the cyst as soon as possible.

After multiple failed attempts to try and drain the cyst, doctors told her that they would try again in 3 months time because they feared puncturing her lung (being that this was close to where the cyst was).  M was nervous to wait that long, and rightfully so. M opted to get another opinion after not feeling that it was just a "cyst", after all, it had been 3 months and it had not gotten any smaller!

Finally the proper testing was done and a biopsy was put in place, unfortunately the news was delivered later that evening that she indeed did have a tumor, measuring 2.5 cm. at that!

How was the breast cancer treated? 

M decided to have a mastectomy, it was not an easy decision, but one that had to be made rather quickly as her life was on the line.  After having the mastectomy, a temporary implant was inserted and chemotherapy ensued.

What made this a success story? 

After 6 rounds of chemotherapy, spread over 18 weeks, the cancer was gone! April of this year (2012) will mark 9 years since her last treatment!

What type of support system got them through this hard time? 

Having a wonderful husband/wife is always something positive, sometimes the person you choose to be with during sickness and health is the same one who gets you through sickness into health and that's the honest truth.  In this story I saw a lot of different outlets for M, and I think she was super lucky to have friends and family by her side until the end of this terrible journey, that is what drives a person for sure.  M also had her work family behind her 100%, allowing her to work from home part time and giving her all the time she needed to mentally and physically recuperate.   It is with the loving guidance of those that you love around you that gives you hope, if they believe in you, so should you.  M credits having so much to live for as her reason for "fighting like a girl" and conquering cancer!

Next part in this series will be up some time the week of 10/17.

To Fighting Like A Girl Always,

xox

Wednesday, October 5, 2011

Good Eats: Banana Cream Pie!

Yummm, as I type this blog post, I am craving yet another slice of this bad boy! So rich and delicious, who wouldn't love this recipe?! Lets get started: 

Ingredients: 

1 Medium Orange (I used a large one and found that it was super orangey so if you like this use a large one! I didn't mind :) 
1 Pre-made Nilla Wafer Crust (can be found in the baking aisle of your super market, if not use a graham cracker one!)
3 Bananas
3/4 Cups Granulated Sugar
1 Box Mini Nilla Wafers
1/2 Tsp. Vanilla extract
1.1/4 Cup Whipped Cream (you may use light or fat free as well, tastes just as good!)
2 Tbsp. ROOM TEMPERATURE butter (I used organic, you can use regular if you wish--non salted!)
3/4 Cup Heavy Cream
1/4 Cup Light Corn Syrup (can be found in baking aisle as well)
1/2 Cup water
1/4 Tsp. Salt (to bring out all of the wonderful flavors in this pie :)
5 Egg Yolks (I used Organic Brown Eggs, feel free to use whatever you prefer)
1/2 Tsp. Vanilla Extract (yes a separate 1/2 tsp--this is for the pastry cream filling)
1.1/2 Cups Scalded Milk
1 Tsp. Unsalted Butter (yes a separate 1 Tsp. this will be used for the filling as well)
2.1/2 Tbsp of Cornstarch
1/2 Cup Granulated sugar and a pinch more to your personal liking :) (this is another additional measurement)

Cooking Tools You Will Need: 

Whisk
Rubber Spatula
Wooden Spoon
Medium pot
Medium Bowl
Zester
Liquid and Dry Measuring Utensils


  • First you want to mix together all of the egg yolks and the 3/4 Cups of sugar. Add in the cornstarch and keep whisking until everything is a pale yellow color.
  • In the meantime, bring the milk to an almost boil and when it has reached this point, add it to your bowl slowly while also continuously mixing the egg yolk and sugar mixture. 
  • Pour this mixture in your medium saucepan and put the flame on low heat. While this mixture is warming, be sure to continuously whisk it until you realize it is thickened well. 

  • Once your mixture is thickened, remove it from the heat and add the orange zest (this adds such a delightful taste!) and the 1 Tsp. of Butter.  Mix well and place everything in a bowl being sure to cover the top with plastic wrap. You want to place the plastic wrap right on top of the mixture instead of on top of the bowl, this assures that the pastry cream filling doesn't form a film at the top. Leave in the fridge until everything is cooled. 
  • Next we are going to work on our homemade caramel! :) Begin by placing the water and light corn syrup into another medium sauce pan. 
  • Add the second listing of sugar (1/2 cup) and be sure to NOT mix it all together, just let it sit there in a white mound on the bottom of the pan--I have OCD tendencies so this was SO hard to do haha
  • Put this over medium low heat until you can't see anymore of the white sugar and you are confident it has dissolved.  
  • After you see this, pipe up the heat to high and bring it to a vigorous boil, remember not to stir! This process will take about 10-13 mins, but be patient, you want to wait until it reaches a nice amber like color :)

  • Once the mixture in your medium saucepan has turned an amber color,  turn the flame back down to low and add in your room temperature heavy cream. BE SURE TO DO THIS VERY SLOWLY! 
  • Continue to whisk this heavy cream in pretty fast, you don't want to go too slow or the caramel will form a clump on your whisk, believe me, I've done that before! (your mixture is going to look pretty out of control once you begin adding the heavy cream, but take control of it and don't let it control you! lol whisk whisk whisk and you MAKE it come together! :)
  • After everything is combined and you have what looks like caramel, add 3/4 of this in with your sliced bananas in a bowl and coat them evenly. (I say 3/4 of the caramel because you may want to use some of the leftover caramel as a drizzle for decoration before serving)

  • Place this banana caramel mixture as the first layer in your pie, smoothing it our over the bottom. 
  • Place your mini Nilla Wafers as a thin second layer right over the banana mixture. 
  • Remove your heavy cream from the fridge (hopefully fully cooled at this point) and spread a layer of that over your Nilla Wafers being sure to smooth everything out evenly. 

  • Lastly, take out your whipped cream and spread this as the final layer. I am going to warn you now, some of the caramel may ooze out of the sides depending on how thick you have made your layers, but have no fear, this can easily be wiped up and your pie will not suffer in flavor because of this :) 
  • Don't worry yourself about being perfect while spreading your whipped cream, the "homemade" look is what we are going for anyway right?!
  • Leave this pie in your fridge for at least 4 hours (I left mine over night because after 4 hours it still wasn't "set" all the way and not everything had congealed together as I would have liked it to at that point. 
  • Place a piece of aluminum foil under your pie so that if any of that yummy filling leaks out, your fridge will be saved! 
There you have it! When you slice into this, you will have a little slice of heaven. You taste everything from the caramel to that sweet pasty filling and even the lovely orange--zest is pretty strong!

This recipe was a hit with everyone who had the pleasure of trying a piece, its truly a piece of comfort, and I LOVE bananas and anything banana so this is for sure one of my favorite pies to make :)

3 Bananas and some Caramel,

xox

Monday, October 3, 2011

Narrow Calves and Fall Boots!

I find that many stores carry boots that my poor little calf just swims in--and I don't think I have particularly narrow calves either--it can be quite frustrating.  If you fall into that category, the category of ladies like myself who will try on gorgeous boots and then realize the diameter is just way too large, this post is for you :)

There are a few tips to searching for boots that will more comfortably fit you.  They are simple, and if you shop only those kinds of boots, you will be sure to almost never be disappointed by trying on a boot that is just simply too large.  Here are my personal tips:

1. Search for boots that have things like buckles and lace ups. These will ensure that YOU will be able to control the size of the diameter of the shaft of the boot. I often find myself going for these sorts of boots :)

2. When shopping online, be sure to always look at the more info section and search for the part where they list the inches of the diameter of the boot.  Anything 6.5' + is an almost no go in my book. If I am really set on them, however, I will make it a point to go try them on in the actual store to assure that the measurements aren't just off.

There will be times that a boot is just a "smidge" too large and not to the point where it looks awkward.  With these sorts of boots, I like to sport the "fashion knee socks under the boots" look.  This can actually be SUPER cute! I love doing this with argyle patterns, plaid patterns, and even just solid colors. The knee socks can really add a pop of something fun to your look.  That tiny peek one may get into your boot will be a surprise  :)

Here are some boots ranging from $29.99-$100.00, so there is something for everyone! These boots came from either Macy*s or Target :)


You can pair leggings or skinny jeans with any of the above pictured boots comfortably.  Who doesn't love a good skinny jean and fashion boot? :) I don't want you guys to feel limited to the ones I have shown you above, I just wanted to give you some ideas as to what to look for and what stores carry these types of "non wide calf boots".  Remember, look for adjustable buckles, diameter of the shaft size LESS than 7' and lace up boots or booties. 
To skinny calves everywhere, 

xox