Showing posts with label Recipes. Show all posts

Saturday, September 28, 2013

My Apple Pie Recipe

You guys saw my previous post about my apple picking adventures, and if not go check it out now! So if you were wondering what I did with that whole bushel of apples, here is the post that answers that :) This pie is a favorite in my family and I promise it will be in yours too, enjoy!

Here's what you will need:

  • 6 Apples (I like Golden apples but whatever you like most will work)
  • Double layer pie crust--I buy the Pillsbury packaged ones--they come in a roll and are two to a pack which makes the process way easier--you will need just two but I often find that having an extra pack on hand for any mistakes or to reshape the crust is really handy.
  • 3/4 Cups of white granulated sugar
  • One medium orange
  • 2 Tbsp Flour
  • Lemon juice
  • 1 Tsp of cinnamon
  • 1 egg 
  • 1/4 Tsp of Salt
  • 1/4 Tsp of Nutmeg
Preheat your oven to 425 degrees Fahrenheit
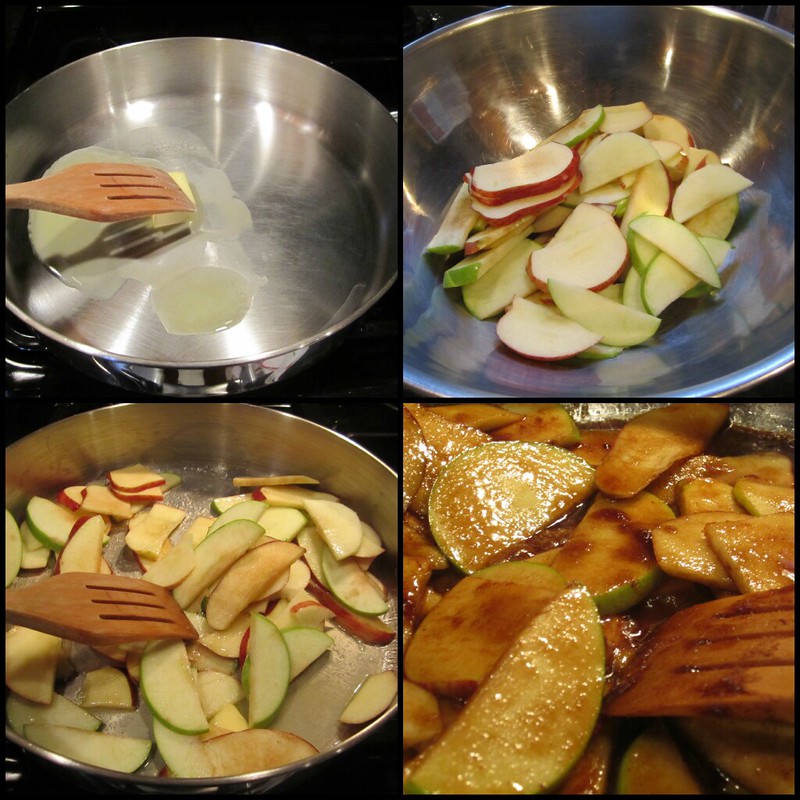
  •  Take your glass pie plate and prepare it for baking by either spraying it with non-stick spray or doing like I like to do and smearing a little butter around the whole thing evenly coating it.
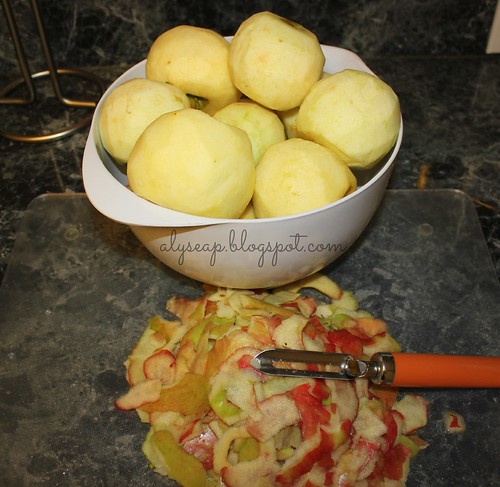
  • Next you want to peel all of your apples and slice them thinly removing the core parts.
pie2

pie3

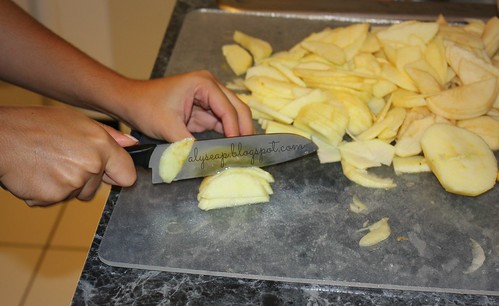
  • Once your chopped apples are in a bowl, squeeze a little lemon juice over top of them to assure that they don't turn brown while you are preparing everything else. Brown isn't a bad thing, it's just an esthetic thing ;)
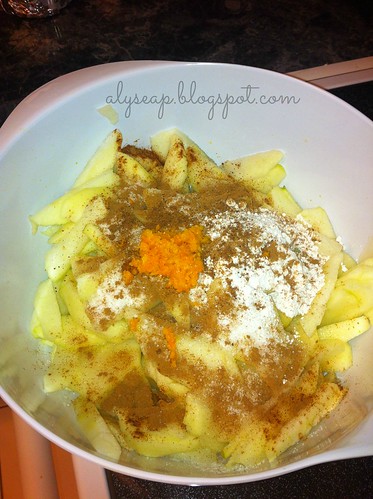
  • After this you will want to add everything else on your ingredients list. For the orange you want to use a zester/microplane or grater to zest the orange--I use 3/4 of the orange but if you're really not into the whole orange thing you can use none at all or 1/2 of the zest from the orange. I personally love the way the orange brings out all of the delicious the flavors we are going to add atop the apples, it's a perfect twist :)

applepie3
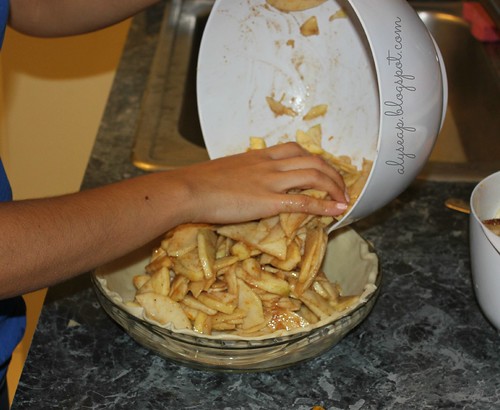
  • Spread out the pie crust in the bottom of the pie pan assuring that there are no air bubbles, mine was a little short (this can be fixed by using a rolling pin to flatten it out a bit more) but ideally it would hang a smidge over the side of the plate.
  • Next place all of your seasoned apples in the pie plate and even out. 

pie4
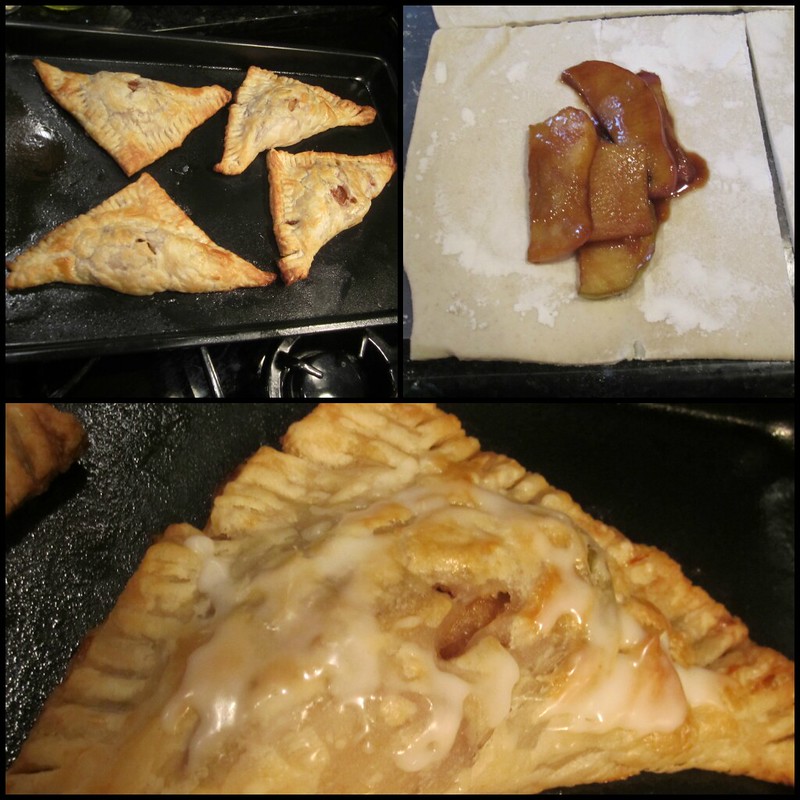
  • Now roll out that second pie crust and cover the apples, there are two ways I like to do so, either a traditional cover-all or a lattice design, either way is beautiful :) 
pie5
This one is only partially completed, but it is a lattice design, it's actually rather easy to achieve, just have to get the pattern down :) My boyfriend did it because I was having no luck with hand eye coordination this evening hahaha We looked up a YouTube video on how to make this top layer so if you aren't sure by just looking at the photo, just watch a video :)


ApplePie1
Pictured here is the traditional cover-all design which consists of covering the whole pie and crimping the edges with a fork to seal them together. We then make four slits in the top so that the pie can "breathe" and bake thoroughly.

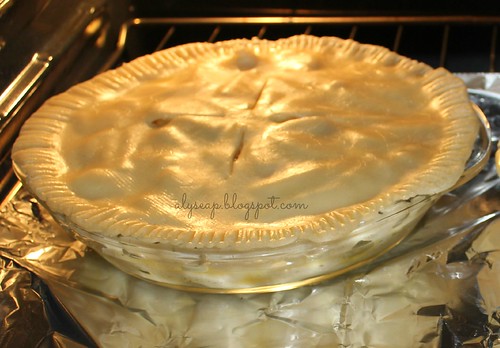
  • After covering the pie with either design, you will want to make an egg wash of beaten egg with a teaspoon of water. Brush this over top the crust evenly and pop them in the oven for about an hour continuously checking on them. If your edges start to brown too quickly too soon in the baking process, cover them in aluminum foil or a pie crust cover, those are super handy! Continue baking and then let them set to cool for about an hour or so so that everything can come together and not be watery. 
**There is a chance that the pie will bubble over because the juices that are being made on the inside are that divine, just place some foil or a baking sheet underneath of the pie at the beginning of the baking process to keep your oven clean.

pie1

Last but not least, let your taste buds enjoy :) This can be served with a scoop of vanilla ice scream for a really rich treat!

This gal has baked three of these in the past two weeks,
xox

Sunday, April 14, 2013

Steak au Poivre Recipe (Photos Included!)

IMG_3700

Truth be told, if you aren't a meat lover, you probably won't be able to understand the intense "deliciousness" of a great cut of steak. I tried the whole vegetarian thing for a little while in high school and here I am blogging about a steak recipe, so you see where that left me lol There is nothing I love more, when it comes to food that is, than a juicy steak. Who doesn't love Filet Mignon?! 

The boyfriend decided that he wanted to try something new one night so we decided to whip up some peppercorn Filet Mignon otherwise known as Steak au Poivre.  Now, you can use this recipe with any cut of steak but I prefer the tenderness of a tenderloin like here. (using the word "tender" twice so close in that sentence made me feel a bit awk....moving on...)

Here is the delicious recipe!

What you will need:
  • 2 steaks (this is supposing it is just you and a special guest--for more people just double etc.) It is great to get a cut that is around 1-1.5 inches thick at the most but no less.
  • Salt
  • 1-1.5 tbsp. freshly ground peppercorns (the peppercorn container in stores usually comes with a grinder attached)
  • 1 cup of heavy cream
  • 1/3 cup of any cognac of your choice with an extra tablespoon reserved (we used Hennessy)
  • 1 Tbsp unsalted butter
  • 1 tsp. olive oil
  • A pan that is NOT non-stick---you will see why later
Directions:

  1. You want to work with room temperature steaks for a recipe like this so once they are at room temperature (you can achieve this by setting them outside of the refrigerator covered for about 45 minutes before you are going to begin the recipe), sprinkle them with salt on both sides (this brings out all of the yummy flavors and helps prep them for what is going to happen later!)
  2. Crush or grind your peppercorns (if you aren't lucky enough to have a grinder, place them in a good old plastic Ziploc and crush them with a kitchen mallet or something of that sort) and spread them onto a plate. Then, as seen in the very first photo above, cover both sides of the steaks by GENTLY pressing them into the peppercorn mixture. 
  3. In a medium heated skillet, melt the olive oil and butter together. Once they are golden in color, and sizzling with delight, place your steaks into the pan. 
  4. Depending on how you like your steaks cooked, you can either cook them for 4 minutes on each side (medium rare) or add two minutes to each side for medium and so on and so forth. I did mine for about 7-8 minutes on each side--I don't like my meat too too red. 
  5. This next part is KEY!!!!! Remove the steaks and set aside under foil to keep them warm. DRAIN THE EXCESS FAT FROM THE PAN WITHOUT SCRAPING THE GOODNESS THAT HAS BURNT ON THE BOTTOM! (this is why we DID NOT want to use a non-stick pan). 
  6. WARNING: FIRE INCLUDED IN THIS STEP! Once the pan is removed from the heat, I set mine on a trivet on the kitchen table, pour in your cognac (minus the reserved tablespoon). Now carefully ignite the contents in the pan with a long lighter or a long match. It will shock you at first (I had my boyfriend do this part because I was scared but honestly it wasn't even that serious haha) Swish the pan with the flame going lightly until the flame dies down--and no worries it will!
  7. Bring your pan back to medium heat and add the heavy cream. Bring this to a boil for 5 minutes or so until it thickens. Make sure to consistently whisk the contents to make sure everything is mixing well together. 
  8. Once it is thickened to your liking, taste it, if it needs it, add more salt and or the extra reserved cognac :) 
  9. Add the steaks back to the pan and pour some of the delicious cognac heavy cream mixture over them and serve!
Photos of my Steak au Poivre rendezvous in the Kitchen


IMG_3702
IMG_3705
IMG_3706
IMG_3724
IMG_3726
IMG_3730
I hope you are able to enjoy this delicious steak recipe soon---writing this up made me want it again!

Steak and Peppercorn Goodness,

xox

Saturday, March 23, 2013

Cajun Chicken Stuffed w/ Spinach and Pepper Jack Cheese FULL MEAL RECIPE!

Chicken is so handy to have in the fridge or freezer  because the options for meal time when it comes to chicken are almost endless. Let's see there is chicken parmigiana, grilled chicken, lemon chicken, balsamic chicken, chicken cubes for stew, stir fry, I could go on forever. This is just another variation of a simple chicken dish, yes SIMPLE. It is super tasty, beginner friendly and will be a crowd pleaser for sure. Let's get to the good stuff:

Ingredients: 
  • 1 package of boneless chicken breasts (or however many you may need to feed your group). Make sure they are the full sized ones and not the thinly sliced ones, I'll explain why later ;)
  • Pepper jack cheese, preferably shredded but if you have slices no worries, we can make that work too!
  • 1 c frozen spinach, thawed and drained (I used fresh spinach instead)
  • 2 tbsp olive oil
  • 2 tsp Cajun seasoning-This can be found in the spice aisle of your supermarket usually
  • 1 tbsp breadcrumbs
  • Salt and Pepper to taste
  • Wooden toothpicks
     
 Directions: 
  1. Preheat your oven to 350 degrees F. 
  2. Butterfly (slice in half but not all the way through, see photo below) the chicken breast and flatten a little with mallet. 
  3. At this time if you are using fresh spinach, cook it down in a pan with a little water.
  4. In a bowl combine the cooked spinach, cheese and salt and  pepper. (if you are using sliced cheese like I did in the photos, just break them up into tiny pieces.
  5. In a separate bowl, mix the bread crumbs and Cajun seasoning together. 
  6. Now for the creative stuff :) on each piece of chicken, spoon a little bit of the spinach and cheese mixture in and begin to roll it together fastening it with as many toothpicks as needed keeping in mind how many you use so you know how many you have to take out later. We don't want anyone eating any wood chips ;)
  7. In a baking pan or on a baking sheet, line it with some aluminum foil and place the neatly sealed chicken breasts seam side down. With a kitchen brush, "paint" on some of the olive oil on each piece of chicken and then sprinkle on the Cajun seasoning and breadcrumb mixture. Make sure you get the seasoning all around the sides of the chicken, even the under-side. The more flavor the better!
  8. Pop these in your oven for 35 minutes or so or until you can assure that your chicken is cooked thoroughly.

IMG_3681
IMG_3684
IMG_3686
IMG_3688
IMG_3690
That little piece in the bottom is a piece I made for my dog, spoiled, yes I know hahah :)
IMG_3695
chicken

Here are quick recipes for the sides I made to accompany this dish:

Sauteed Green Beans
  • Wash the green beans and coat the bottom of a sautee pan with a tablespoon or so of olive oil
  • Add minced garlic as much as you like over medium to low heat
  • When the aroma begins to kick in, add in the green beans and cook for a few minutes until they are soft enough for your liking. I like mine a little crunchy so I take mine out earlier ;)
  • You can also add a little salt and pepper if you wish
Quick and Easy Potato Wedges
  • Slice your potatoes into wedges, thin or thick as you like
  • Place them in cold water for a minute or so, remove them and dry them completely
  • Sprinkle a little olive oil over them and some fresh ground sea salt
  • Place them in the oven at 425 degrees until they become golden brown and cooked through (35 mins give or take---this has always taken a different amount of time each time I've made them...just keep an eye on them and keep mixing them to see when they're done the way you like them :) 
IMG_3697
 

IMG_3693

My mouth is watering just thinking about this, I have to make it again soon!

xox

Saturday, March 16, 2013

Puerto Rican Beef Empanada RECIPE!

Whether you are having unexpected guests over or you are in the mood for a quick snack to "hold you over until dinner", these are the perfect pick me up, yes pick me up, these little things seriously make me happy :) haha You can also, however, eat these accompanied with some rice for a full meal, I have often done that as well. Ok, enough of the blabber, let's get started with the goods!

Ingredients:
  • 1 package of the (white) flour discs, I get the GOYA ones (This will make 10) *DEFROSTED*
  • 2 Tbsp. Sofrito (recipe below)
  • Adobo Powder (I also use the Goya one, Goya should sponsor me already right?! lol)
  • Small can of plain tomato sauce
  • 1 lb. Ground Meat (you can actually use beef, turkey chicken etc.)
  • Vegetable Oil (we use this to fry them)
Basic Sofrito Recipe: 
  1. Combine yellow onions, green AND red peppers, Cilantro and garlic in a food processor until its a very fine texture. ---Yes, it IS that simple ;)

Directions: 
  1. In a skillet, brown the meat and drain out any excess fat that may be lingering there
  2. Return the cooked meat to the pan and add in the 2-3 tablespoons of sofrito (I like mine VERY flavorful so I add 2.5 tablespoons to 3 sometimes :) Then sprinkle with adobo to taste and add your small can of tomato sauce. 
  3. Turn the flame back on to low heat and let it simmer for another 15 mins. 
  4.  While this meat mixture is cooling off, start heating your oil (to 325 degrees)--this can take a little while so be patient :) I always stick a spoon in and see if it sizzles to tell if it's hot. 
  5. While the oil is heating begin preparing your empanadas for frying. This means adding 2 Tbsp. or so of the meat mixture to the center of the flour disco. Fold it into a half moon shape and seal the sides by pressing down a fork and making a pretty little design at the same time :) 
  6. After sealing them front and back (this assures that nothing leaks out!) Set them aside until your oil is heated, once this is so, place 3 or 4 (depending on the size of your pan) at a time in. Once you see one side golden brown, flip them over. 
  7. Once you can see that both sides have cooked evenly, place them on a paper towel to drain excess oil and YOU ARE DONE! 
I actually did this process with the kids and they loved it. Away from the burning oil, which I did, it was a fun way to get them involved in the kitchen :) It is so simple to instruct as well!

**In mine I added a tiny slice of cheese to make them meat and cheese, you do this during the "stuffing process". You can do this easily to any of the other versions as well! **

If you aren't afraid of a little spice, top them off with some hot sauce while you are eating, it is truly superb!

Here are some photos of "empanada day":

photo 2

photo 3

photo 4


If you decide to make these, let me know how they come out :)

These may not be the healthiest (fried foods), but as a treat, they are just perfect. I have another recipe to come that is healthier no worries for my healthy readers :)

¡buen provecho!

xox

Monday, February 11, 2013

A Warm & Cozy Meal: My Stuffed Peppers Recipe

I posted photos of this on Instagram and Twitter (@alyseap) this weekend and I got great feedback :) Here is what I made this weekend, photos and full recipe included. Enjoy!


newone

33

1

14

15

17

66

Ingredients:

  • 4 Bell Peppers (try and make sure they are shaped nicely to sit upright and firm as well)
  • 1/2 cup chopped onion
  • 1 1/2 cups cooked brown rice (you can use any rice you prefer)
  • 1 can (14.5 oz.) of diced tomatoes (I used spicy tomatoes and it added a nice kick!)
  • 1 can of tomato sauce
  • 1.5 cloves of garlic minced
  • 2 Tbsp. EV Olive Oil
  • 1 Tsp. Basil
  • 1 Tsp. Oregano
  • Salt and Pepper to taste
  • 1 Egg
  • 2 Tsp. Worcestershire Sauce
  • Between 1-1.5 Lb.s Lean ground beef (I ended up using 1.15 Lbs. and it was perfect!)
  • Optional Grated Cheddar Cheese to top off at the end
Preheat your oven to 350 degrees F.

Directions:
  1. Wash your peppers and core out the insides removing all seeds and things of the sort. You can do so by slicing off just a bit of the top and scooping out everything else. 
  2. Because we try not to waste anything, use some of the pieces of  pepper that you cut off from the top that may be salvageable (or some new pepper if you wish) to cut about a half cup of pepper for the sauce. 
  3. In a large pot of salted water, add the peppers that you have cored out.  Bring them to a boil and let them simmer for about another 3-4 mins. Then remove and drain. 
  4. Heat your olive oil in a pan and add in your chopped pepper pieces, onion and garlic until they are tender.  
  5. Add in all of your tomato products (sauce, diced tomatoes, etc) along with your spices (oregano and basil, salt, pepper etc.) Cook this thoroughly in a simmer for about 8 minutes or until all of the flavors smell delicious and look well combined :)
  6. Next we beat our egg with the Worcestershire sauce and a pinch of salt and pepper. Add to that our ground meat and cooked rice and mix everything very well. Add in about 1.5 cups of the tomato mixture to help everything stick and come together and to seal all of the delicious flavors in. 
  7. On your nonstick baking sheet or casserole dish, place all 4 peppers down and begin to fill them with the meat and rice mixture.  I make sure to press down gently while filling to make sure that there are no air pockets in the peppers that are missing some of this delicious mixture! 
  8. Fill them to the brim and top off with the remainder of the tomato sauce mixture that you have left over--then place in the oven to bake for around 1 hour. 
  9. When the timer goes off, I shut off the oven and sprinkled a nice portion of the grated cheddar cheese over the top and closed the oven again (with the heat off at this point)--there is still enough heat in the oven to melt the cheese ;)
  10. Serve and enjoy!
*You can serve this with any side--add more plain rice to mix together or even serve with a baked potato or alone (how I had it)!

Any questions or clarifications, comment below or check out the "Contact Me" tab above for my email link!

Savory and Warm Meals,

xox

Thursday, January 3, 2013

My Daily Smoothie!

I've been drinking these smoothies for a while now. They've helped me gain energy and really boost my normally terrible immune system. There isn't anything crazy in them, just some good greens and a few berries and a banana. I'll explain the benefits of all of those below. Sometimes I add more or less of one of these things because I don't measure for precision but the ingredients are always the same for the most part.

Alysea's Green Smoothie:

Kale- the benefits of green veggies are endless but being specific to kale, its benefits are : protects our cells from free radicals via antioxidants, anti-inflammatory, provides glucosinolates which have been shown to prevent colon, breast and many other cancers, high in fiber for the regulation of your digestion system, lowers cholesterol, high in Vitamin K to strengthen our bones, boosts immunity and lower blood pressure.

Spinach- aids in digestion, maintains low blood sugar, anti-inflammatory, antioxidant, lowers blood pressure, protects the eyes from cataracts, strengthens bones, healthy skin, healthy nervous system and brain function.

Banana- keeps digestion regular, low blood sugar, lowers blood pressure, retention of calcium, breaks down bacteria in the stomach that causes ulcers, lessens your chance at getting kidney cancer, ensures the production of enough white blood cells to fight off infection in the body.

Berries- packed with antioxidants, lower blood pressure, decrease bladder infections, high in fiber, anti-cancer and anti-inflammatory properties, great source of Vitamin C, and reduce dental plaque.

I also add two tablespoons of ground flax seed to my smoothies when I have it on hand because flax is a miracle worker for the body all on its own! I even eat it in my oatmeal :)

For someone who finds herself not always able to sit down and have a bowl of fruit or a side of vegetables, this is the quick and easy and DELICIOUS way might I add, to get the vitamins my body needs. It's the perfect pick me up to start the day.

You can even as celery, even broccoli or cucumber and lemon or an apple etc. the concoctions are endless, this is just one of my favorite blends :)

Fear not, adding a very ripe banana (with brown spots is the best!) is an excellent way to naturally cut the bite of the vegetable flavor. Kale and spinach, however, are much milder in flavor than say celery.

Here are some photos:


photo 1

2

photo 3

4

Drinking to a healthier you,

xox

Saturday, December 22, 2012

One of My Weaknesses: Apple Turnovers!

Ingredients:
4 apples (any of your liking, I used a mixture of three in mine because I like to spruce everything up a little ;)- cored and thinly sliced. You may also peel them but this is optional.
3 tablespoons butter
1 cup brown sugar
1 teaspoon ground cinnamon
1 tablespoon cornstarch
1 tablespoon water
1  pkg. Puff Pastry Thawed at room temperature
1 cup confectioners' sugar (for the glaze which is also optional)
1 tablespoon milk
1 teaspoon vanilla extract
1 egg (for egg wash)
1 tablespoon water (for egg wash)
Directions:
1. Melt butter in a large skillet over medium heat. Add the apples to the melted butter in the skillet and cook them while stirring for about 2-3 minutes. Add brown sugar, and cinnamon, and then cook, for 2-3 more minutes. In a separate dish, mix together cornstarch and 1 tablespoon water. Pour into the skillet, and mix well. Cook for another minute or so, or until sauce has thickened. Set the apple mixture aside from the heat and begin your next step.
2. Preheat the oven to 400 degrees F (200 degrees C).
3. Prepare your puff pastry sheets by rolling them out to be about an inch wider than they already are. Be sure to flour everything accordingly so your puff pastry doesn't stick to everything and tear. Trim each sheet into a square. Then cut each larger square into 4 smaller squares. Brush some of your egg wash (your 1 egg beaten with 1 tbsp. of water) alongside the edges of each individual square. Spoon apples onto the center of each squares. Fold over from corner to corner into a triangle shape, and press edges together to seal. Place turnovers on a nonstick baking sheet, leaving about 1 inch between them.  Cut an "X" shaped hole in the top of each pastry to give it breathing room. Then brush some more egg wash over the top so it will get a golden brown crust.
4. Bake for 22-25 minutes in the preheated oven, until turnovers are puffed and lightly browned. Cool completely before glazing.
5. Now for the extra yummy part, the glaze-- mix together the confectioners' sugar, milk and vanilla in a small bowl. Drizzle glaze over your apple turnovers and you're done!


apple2
apple

Enjoy!
xox

Monday, August 6, 2012

Spicy Chipotle Turkey Burger Recipe

A few weeks ago I made these Spicy Chipotle Turkey Burgers and they were the most delicious turkey burger that I have ever had hands down! They were juicy and very flavorful with that extra kick of spice from the chipotle peppers which I love! Where I live we are still in the Summer season, although we are pretty much wrapping it up--but I am sure that weather permitting, grilling season has at least 2-3 months to go which means you're in luck if you're reading this in hopes to find something delicious to whip up for your grill :)

Here is the rundown on how to get these burgers:

When using 1 lb. and depending how large you like your burgers, you can get roughly 4-5 burgers. I used a little more than 1 pound and I got 6 rather large burgers, portion size is up to you! :)
  • 1 lb. lean ground turkey (we always look to purchase the most lean meat offered, better for you!)
  • 1.5 teaspoons of freshly minced garlic
  • 1/2 cup chopped onion (chop these small so that you don't get that rude awakening as you bite into a large piece of onion! haha
  • 2 tablespoons chopped fresh cilantro
  • 2 chipotle chile peppers still in the adobo sauce (these can be found usually in the spanish food aisle of your supermarket)--you want to finely chop these up to add to your meat mixture
  • 1 teaspoon salt
  • 1/4 teaspoon black pepper
  • Season the meat with a little adobo powder (goya) if you don't have this just add 1 tsp. garlic powder and 1 tsp. onion powder in addition to your salt and pepper.  
  • Slices of any cheese of your liking, we chose mozzarella and it was delicious! Use whatever cheese you have on hand!
  • Your hamburger buns

burgers
The photo above is more or less what your meat should look like when finally done being prepared.

Once you are happy with the seasoning of your meat, divide it to be formed into burger patties. This is a trick I use to ensure that almost every burger is of a uniform size:


burgers2
With your clean fingers, pre-divide the meat while it is still in the dish :)

Once you form them into the pattie size you want, grill them over medium-high heat until they are cooked to your liking.  I like to slice a little hole in the middle of the largest one to take a peek inside to assure that it is cooked thoroughly, we don't want anyone getting sick here! haha To give you a rough time it should take about 4-5 minutes per side before you flip for them to be cooked well enough. A minute or so before you are finished cooking them, add the cheese that you chose and as that melts down, you are finished!

Before I was able to capture a photo of what the finished product looked like for these, they were devoured! Shows you how good they came out right?! lol


Enjoy,

xox

Thursday, June 14, 2012

My Favorite Pasta Dinner Lately-Recipe Included!

At work yesterday, I began craving this meal so badly! It is hard to plan entire meals to cook because I get out of work at 7 and by the time I make it home the last thing I want to do is cook a full on meal, but sometimes, like in this instance, it is a must! This dish is so savory and my boyfriend actually eats the broccoli which must mean its delicious as he is not one for greens! lol The first time I made this dish was a few months back when I saw it in my FOOD magazine, I was in love!  (By the way, if you are a foodie like me, I HIGHLY suggest subscribing to that mini magazine, it has AMAZING recipes every month and they cater to the season!) Anyway, back to my craving haha I stopped by the supermarket after work and picked up the ingredients and I definitely wasn't disappointed with the turnout!

Here is how I made it happen:

Rigatoni with Sausage and Broccoli: 

Ingredients: 

  • 1 pound rigatoni
  • Salt and ground pepper
  • 1/4 cup extra-virgin olive oil
  • 2 heads broccoli
  • 2 garlic cloves, minced
  • 1 tablespoon finely grated lemon zest, plus 2 tablespoons lemon juice
  • 1 pound Italian sausage MEAT (You can purchase just the sausage meat without the casings, that's what I always do!) --I used Mild, you can use hot if you'd like, next time I will probably try that!
  • Parmesan, grated, for serving

 Lets get to it:
  1. In a large pot of boiling salted water, cook pasta according to package instructions. In last 2 minutes of cooking, add broccoli and cook until bright green and crisp-tender. Reserve 1 cup pasta water; drain pasta and broccoli.
  2. Meanwhile, in a small bowl, whisk together oil, garlic, lemon zest and juice, 1/2 teaspoon salt, and 1/4 teaspoon pepper.
  3. Add sausage to pot and cook over medium-high, breaking up meat with a wooden spoon, until browned and cooked through, 8 to 10 minutes. Remove from heat, return pasta and broccoli to pot, and add oil mixture. Toss well to combine, adding enough pasta water to create a thin sauce that coats pasta. Serve sprinkled with Parmesan.

    *This recipe originally had Anchovies incorporated in the sauce, which I hear really brings out the flavors of the dish without actually tasting like fish, BUT I just cannot bring myself to put them in here lol If you would like that version then add 4 minced anchovy fillets into your olive oil mixture!


    This dish is an amazing next day dish as well! The flavors almost marinate all together overnight and it is almost more delicious :)


buon appetito!, 


xox

Thursday, May 31, 2012

Calling All Nutella Lovers: NUTELLA COOKIES INSIDE!

I am not a fan of Nutella personally, I know start yelling at me now, but I am just not that into chocolate products, and lets face it, this tastes like hazelnut chocolate! However, when incorporated into a cookie, I simply couldn't keep my little hands off of these things! Here is just another way to eat Nutella that will for sure leave others asking "how did you do this?!" :) It is SO simple too! Keep reading below for the recipe, and my next Nutella recipe is coming soon!


Ingredients:

1 ½ cups flour
½ cup granulated sugar
½ cup packed light brown sugar
½ cup unsalted butter, at room temperature
½ cup Nutella
1 egg
¼ tsp. salt
½ tsp. vanilla extract
1 tsp. baking soda
1/3 cup mini chocolate chips

Preheat your oven to 350 degrees Fahrenheit. 

Yields Approx: 25 cookies

Directions:

  1. Mix together the  butter with an electric mixer or a whisk (my favorite) until everything is incorporated and a smooth consistency.
  2. Next put in your brown sugar and your white sugar and mix those very well until the consistency of the mixture is light and airy.
  3. Now you are going to add in that egg. If you are using an electric mixer be sure to have it on a low speed so you don't get splattered! Also add your vanilla at this time and then the Nutella!
  4. In a separate bowl whisk together the flour, baking soda, and salt. Add  these ingredients to wet ingredients, and mix on low speed until incorporated. 
  5. Fold in the chocolate chips now, bringing up the mixer speed to medium at this point.
  6. Now it's time to make the cookie rounds! Take about teaspoon full and roll them into little balls.  I use a cookie scooper to do this with ease and to assure the same size cookies, after all presentation is key remember! :) ** A trick I read online somewhere was to put the dough in the freezer after rolled into the cookies for about 10 mins or so before baking to prevent them from becoming so spread out, I don't know how well this works per-say, because I haven't really ever tried these cookies without doing it lol BUT I say what the heck why not? :)
  7. I baked my cookies about 8 minutes (Remember I put them in the freezer before hand, if you didn't maybe drop the time by 2 mins).
  8.  Let your cookies cool and then serve them up with a big glass of milk! YUM!
Let me know if you guys try this out! They were gone in a day! :)

Nutella isn't just a spread after all,

xox

Saturday, May 5, 2012

My Cinco de Mayo/ Fight Night Menu

This Saturday, today, is a pretty huge food day for me :) Not only is it Cinco de Mayo, but it is also fight night for Mayweather and Cotto! This means this gathering will serve two purposes which means I must find a way to incorporate the two.

Here is how I did so:

I wanted to stick with appetizers so it was easy to just grab and go while watching the fight. I wanted to do appetizers with a Mexican theme to incorporate Cinco de Mayo ;) I chose to make two pretty popular dishes, guacamole and nachos. Who doesn't love a good guacamole dip and some super cheesy nachos?!

With the guacamole I made homemade tortilla chips. Much better (at least in my opinion) than the regular restaurant style fried salty chips. It's super easy too!


Here are some photos of my cooking journey this evening. Enjoy!

* if you would like the recipes for anything I made please let me know and I will forward them! :)

Xox